Showing posts with label Door. Show all posts

Tuesday, May 3, 2016

Leaded Glass Pattern

In typical fashion, I am flitting around my different projects. Last night found me playing with Corel Draw. I really need to learn how to use a photo editor so I can make patterns for making tile, leaded glass and/or stencils. I have a pretty old version I bought about 5 years ago, but it still does the job well enough for my needs.

This is the leaded glass panel I was considering for our front door.
Tonight (or rather last night by the time I got this finished) I managed to draw it out in Corel Draw. I had to extend the height so it would fit in our door. It is nice that CorelDraw can print out this large design across multiple pages so I don't have to pay extra to have it printed on a plotter.
I still have a lot to learn, but this project went pretty well.

Update: And for the record, I also tried making this pattern in SketchUp. In the old Google days of SketchUp it would have been pretty easy to make this pattern, but the new company that owns SketchUp has stripped nearly every worthwhile feature out of the free version (SketchUp Maker). Since I cannot justify paying $700 for the pro version, I guess my SketchUp days are over. I may eventually spring for another CAD program if I can find a good value, but I'll make due with other programs for now.

Tuesday, December 22, 2015

What's Next?

Jeff and I managed to get the guest room all cleaned out for our guest. (No pictures at the moment, because the room is already occupied.) Many of the boxes stored in there were unpacked, but there is still a pile of them in my closet. I'll get to those later as I just don't want to overclutter my sewing room yet.

I managed to not turn on my gaming PC today and instead listed about 10 items on craigslist. (Go me!) I'm again attempting to escape the allure of MMOs to actually get some stuff done in real life. (Our current game is Final Fantasy 14.)

I have started to disassemble the Roman shade panels from Redwood City and I'm planning to convert them into curtains. I had originally planned to just add some width and use them as is, but now that I've had time to think about it, I'm going to unassemble them a lot more and actually insert squares with purple fabric into the mix. I like the fabrics I originally used, but if I add purple, it will go really well with my stencil. :D

Jeff and I are also thinking we're ready to make another leaded glass panel, this time for the huge glass panel in our front door. Yeah, that's a lot of clear glass.
We've been looking around my pinterest images and our current front runner is this design.
It's still mostly straight edges with some curved edges. I think we're up to the challenge. Jeff is working on the pattern in postscript. Once he's done, we'll start poking thru our glass collection. I believe we'll change the color of the flower to purple (rather than the red).

Wednesday, October 7, 2015

Period Book: Distinctive Homes of Moderate Cost (1910)

I found another chapter on portiéres (room door curtains), and, as usual, I am sharing it. Who knows if anyone is interested in this besides me, but at least it makes it convenient for me to access the information. LOL  This is a word-for-word transcription of the chapter.

The book is called Distinctive Homes of Moderate Cost and was written by Henry H. Saylor, ed. and published in 1910. If you'd like to see the original text, you can download it here at Internet Archive.

PORTIERÈS AND WINDOW DRAPERIES

SUGGESTIONS FOR HANGINGS MADE FROM INEXPENSIVE MATERIALS FINISHED WITH SIMPLE DESIGNS IN APPLIQUÉ AND EMBROIDERY

There seems to be a sad lack of originality in the hangings one sees today. It is nearly always the same old velour or the same old rep, guiltless of any relieving color in the way of an edging or an appliqué design. Why not get some distinction into these important elements of home decoration?

After all, the portières in a home are just as important factors contributing to the success or failure of the whole as are the wall covering or rugs. Because they occupy less area than the things we put upon the walls or floors, they are only too frequently passed over without their due of consideration. Their importance and value in carrying out a comprehensive scheme of decoration in color and design is something that may well be reckoned with.

It should be understood at the outset that in the short space allotted to this section it is quite impossible to cover the whole subject of portières. It goes without saying that the designs illustrated here would be utterly incongruous in an Empire drawing-room, for example. In rooms, also, in which other French or Georgian period styles have been carried out in the architectural details and in the furniture, the hangings should, as a matter of course, be along the same lines. There are many beautiful fabrics from which to choose portières for rooms furnished in period styles—and at prices to suit everyone; velours, linen, upholsterers’ velvets, self-crinkled tapestries, brocades, corded silks, goat's hair, Armures, figured tapestries—each of which may be found the one suitable material for a certain purpose.

It is for the everyday American living-room, den, library, or hall, however, that the designs here shown  would solve the problem of hangings—rooms where no period style has been permitted to assume its jealous reign, but where the furnishings are of the simple, unassuming character that marks modern American work of the best type. In such a room the note of individuality and distinction that any of these designs strike will be a welcome and unobstrusive one.

Saturday, October 3, 2015

Period Book: Art and Economy in Home Decoration (1908)

One of the things I like to cover in my blog are topics that are only rarely covered elsewhere (perhaps for good reason LOL). In my recent book downloading efforts, I found one with a chapter on portiéres (room door curtains), so I thought I would do a blog post to convey the information they provided. This is a word-for-word transcription of the chapter.

The book is called Art and Economy in Home Decoration and was written by Mabel Tuke Priestman and published in 1908. If you'd like to see the original text, you can download it here at Internet Archive.

WHAT TO USE FOR PORTIÈRES AND CURTAINS 
IN THE COUNTRY HOUSE

IN many country homes curtains that suggest the modern trend of thought would be out of harmony with their surroundings. If a parlor is furnished in Empire style, what could be more incongruous than hangings of coarse canvas, ornamented with art-nouveau designs? The curtains must be in harmony in tone and design with the Empire period, and would need to be made of rich-looking materials, overtopped with the fitted valance ornamented with Empire designs.

Georgian and French styles must be treated with the same restraint, if the rooms are to be faithfully carried out in any one period, and the curtains must conform to the general style of the room.

In going into houses of well-to-do people, it is surprising to find that draperies that have been made by reliable firms have lost their shape and sag. This should not happen, and would not if sufficient care had been taken when the curtains were made. When they are laid out on the cutting table the interlining must be sewed or basted to the material, so that when in place the curtains keep their shape. Sometimes the bastings are caught only here and there, and after a while they give way: the result is a sagging, lumpy-looking curtain. If the curtains had been made properly in the beginning this trouble would have been avoided.

The draperies of a room should always harmonize with the walls, but should be stronger and richer in tone. Hanging in soft, straight folds, they soften the hard lines and add much to the beauty and dignity of a well-planned room. In providing portières for a double door, the portière can be made by lining or sewing two separate materials so as to form one curtain. The curtain itself will look well, but either one side or the other of the opening will show a blank space of woodwork; also when the sliding doors are closed, one room will be without its portières.

The most usual way is to make the portières to suit each room, the lining of one matching the front of the opposite portière. It is best to use sateen as a lining, as this is made in a wide range of colors. Wherever possible, the lining should match the curtain, but if the heavy curtains at a window are hung wide enough to come in front of the cream or white curtain, and will be seen through the sheer curtains from the outside, then they must be lined with cream. To my mind curtains lined with the same shade are much more attractive than those lined with white or cream, but they should not be more than twenty-four inches wide when pleated up, and not be brought forward to go in front of the window.

An abomination constantly seen is a pair of heavy curtains meeting in the middle of a window and then held tightly back by a cord or band. They give a feeling of uneasiness to those who appreciate the fitness of things, and are in themselves a contradiction. Why hang them forward if you want them back? The same fault may often be seen in sash curtains. They are hung on a rod at the top and bottom of a window, and then a foolish white band or cord holds them back in the middle.

Wednesday, September 9, 2015

Last Door Stripped!

I'm feeling very happy to be almost done! This door just needs a tiny bit of touchup with dental tools and then I can sand it! This was, finally, the last painted door in the house.
There will be a bit more paint stripping of woodwork once Jeff and his friend start demo in the master bathroom, but otherwise, I am done! :D

Tuesday, September 8, 2015

Door Nearly Stripped

After many days of rain, our weather was finally decent again, though a bit humid, so I spent another quiet day with my heat gun and iPod. I am nearly done with both sides of the door. I haven't done the edges yet. A couple more hours will finish off the paint stripping with the heat gun then I'll have to turn my attention back to the chemicals.
In the category of simple pleasures, the fans on my gaming computer started rattling. Probably I could have just removed them and cleaned them well and reinstalled them, but I discovered I could change them out for $8 and have glowy purple fans.
Yeah, the photos are awful because I tried to take the pictures without the light on or camera flash and I didn't want to go dig around and look for a tripod. You guys get the idea; my computer glows purple now, instead of red. LOL

Sunday, August 23, 2015

Last Door!

I have started stripping paint on the last painted door! This is the upstairs bathroom door and since the floor up there is inaccessible, I figured this was as good a time as any to get started stripping paint.
I've been working on this project in short bursts, like an hour or two at a time. I am not going to ruin my hands again; it took 2 weeks for them to heal last time. Also, the forest fires are pretty bad in Oregon so we have an advisory to avoid prolonged outdoor activities.

After about 4 hours in, it got pretty tempting to have this door dipped, but then I remember all the other doors we had dipped came back with the large top panel cracked. Apparently when these doors were made they pieced the wood for the top panel and they come unglued with the soaking. Besides, I would rather spend bathroom budget on tile.

I just keep telling myself I can do this ONE LAST TIME!!

Thursday, July 23, 2015

More Projects

Jeff has been working on digging out the floor of the pergola when the weather is cool enough.
I've finished staining the door for the sewing room. Once it finishes drying I'll start putting on the shellac.
I painted the basement bathroom again, but when I removed the masking tape I discovered one of the rolls of blue tape I used was not a good roll; it didn't have good adhesion. There was some bleed through on the woodwork so I'm going to have to do a little bit of paint clean up, which really sucks. It's not my highest priority right now.
I'm hoping now Jeff will hire his friend and they'll install the cabinet and marmoleum flooring. I still need to stain some shoe molding for both the basement and sewing room.

If we want to install the sink and faucet in this bathroom, we will have to cut a temporary plywood top for the sink cabinet because I'm planning to have the soapstone cut for it when we have the soapstone cut for the master bathroom remodel. It won't be pretty, but at least we'll have another operational bathroom during the remodel of the master bathroom.

Wednesday, July 22, 2015

Backtracking

I stained the door to my sewing room too dark. :( I stained it at the same time as the closet and it also ended up being too dark.

I left it hanging in the doorway since I finished that room to see if I could live with it. Nope, I can't. It will bother me every time I see it during the next 15 years we plan to live here. So, I figured this was a problem easily solved by 80 grit sandpaper.

It doesn't look so dark in the sunlight, but trust me, it looked very dark in that closed hallway.
As expected, sanding the profile was a pain, but luckily we have lots of handy contour sanding bits. I think this is good enough to stain now. I don't believe I have to get it back to pristine douglas fir.

Update on Friday: It's still a little darker, but it's better than it was.

Wednesday, July 1, 2015

Closet Installed

Thanks to Jeff for installing our new brass closet rods. Apparently the new bracket was a little larger than the one in the closet before we refinished. There was exactly one size available in brass finish and I bought it. I can live with it.
I also FINALLY shellacked the doors in the guest bedroom. I stained these all the way back in late 2013, but after they were hung they required some repair in the staining. I have no idea why I didn't just get it done at the time...but I think I was already too busy goofing off in my video games. Now I need to figure out what happened to the door hardware. :D We have so much sifting to do.
Since the guest room is still full of my sewing room furniture I can't back up enough from the doors to get a good photo.
I'm hoping we get some cooler weather next week so I will be motivated to finish painting the sewing room. It's not terrible up there in the morning because of the AC, but it's pretty warm by the end of the day. And the heat has messed up my sleeping schedule again. Ugh. Insomnia sucks.

Monday, November 25, 2013

Emptying Sewing Room

I have goofed off for long enough—time to get moving again. This week I started emptying out my sewing room with the intention of finally finishing stripping the paint in this last bedroom. But since the sewing room has been a bit of a dumping ground for the past many months, I'm having to spend many hours cleaning and sifting it before I actually start packing.

It's actually getting easier to imagine a day when we've finished stripping paint and I hope it will come before next spring.

Late last week Jeff also managed to finally re-hang the doors in the guest bedroom! Woo hoo! It only took us an extra year. 8-)  Pictures will follow soon. I actually stained the doors in September for Jeff's mother's visit, but the doors didn't make it up. Nor did they get hung for another friends visit earlier this month. Oh well, they're up now and once I finish touching up the stain and shellacking them, I'll post photos.

Monday, August 6, 2012

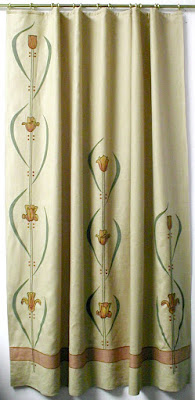
Tulip Portiere

I really cannot stand the French doors in our living room and dining room. They don't stay closed and they don't work with our rugs without chopping quite a bit off the bottom of the doors. They also take up a lot of wall space, which is at quite a premium in this room. These doors probably made a lot more sense when the fireplace was used to supplement the heating on the main floor.

 
So, I've been thinking about making portiere curtains to hang in those doorways so we can take down the French doors and reclaim the limited wall space.

(We would, of course, retain the doors and stow them in the attic for the next owner. Though, we discovered during the remodel the French doors are not original to our house—the house was originally built with pocket doors.)

Anyway, I ran across this portiere design at Textile Studio's web album and I'm in love. I really wish I could afford to buy a set, but perhaps I can make them. I'd actually need to make four of these panels to span both doorways. I guess I found another project to add to my queue.

Update many hours later: When I was trying to research how to actually make a portiere (to answer questions like whether it was lined, or suspended by rings), I went and dug through a number of period texts. I share the best of them below.

Thursday, July 26, 2012

Master Bedroom Doors

It happened! I woke up in the mood to stain doors.

There are so many projects I'm hoping to get done this summer that I figured while the guest bedroom is being worked on by the plasterer I'd better get back to work on the master bedroom.

I'm not real pleased the doors took the stain so darkly, especially the clear vertical grain portions....but it's too late to change it now. I probably need to work on smaller sections next time and wipe the stain off more often.

This room is now ready for shellacking. Hopefully next week we'll get started. I'm beyond ready to move out of the basement and into the bedroom. =)

Tuesday, May 29, 2012

Guest Bedroom Doors

Since I'm still recovering from this stupid cold, sanding seemed to be about the right speed given my low energy level today.

I spent a couple more hours this afternoon on the guest bedroom door paint stripping project. I've stripped and sanded like crazy, but totally cleaning these molding corners continues to elude me. I just can't find the right tool; I've tried the chemicals with dental tools, detail sanders and sponge sanders, but they just don't clean these edges. So, in the interest of my sanity, I've decided to declare the two guest bedroom doors finished!

Luckily, our dark stain will probably cover this paint residue.


So, I've now finished two of the three doors in the guest room. There is still one more door that exits onto the sleeping porch. That one, luckily, only has to be stripped to stain-ready on the inside of the door. The sleeping porch is still too damp during the winter to risk a stained finish on the outside.

Monday, May 14, 2012

Sanding Doors

We can't figure out what happened to our weather. Just in the last week we had a frost warning and then within the space of a couple of days the daytime temps jumped right up into the high-80s. Ugh. We are heat wimps, but we are trying to be productive. We obviously need to get to bed earlier so we can pop up in the mornings and get to work first thing before it gets hot.

Sharon spent a couple hours sanding doors today. She finished detail sanding guest bedroom door #2, and then went back to door #1 to do a bit more stripping and sanding. That door didn't quite get all-the-way finished before she started on the next door because it had been tucked out-of-sight in the basement for the kitchen tour. Anyway, she worked on door #1 for almost an hour until the heat became uncomfortable. (It's hardly worth showing another picture, because they all pretty much look the same by this point.)

Jeff was a kitchen god and cooked all day in preparation for his out-of-town visit. Sharon doesn't cook; at least not much. So Jeff cooked away in the kitchen and filled up the refrigerator so Sharon will have decent food to eat in his absence.

We've been thinking about changing the name of the blog since the renovation is, for the most part, finished. Now we're mostly onto the decor phase of our house project. Sharon's thinking about renaming it 1912 Laurelhurst Craftsman, but she hasn't decided yet. She had some other names in mind, but they always seemed too similar to names of other bungalow blogs and she doesn't want to conflict. If anyone has a suggestion, we'd love to hear it.


Saturday, May 12, 2012

Side Two Nearly Finished

It is perhaps silly to give daily reports on our labors, but when we've spent a number of hours on a project it's hard not to. It's also fun for us to see the progress from day-to-day. (Would you guys prefer we hold posts until the projects are done?)

Sharon had planned to finish stripping the second guest room door today, but she managed to get a puncture wound on the tip of her thumb this afternoon, which prematurely discouraged her efforts. Even so, door two is nearly finished. It just needs a bit of sanding of the contours to get the last bits of paint off.

Jeff managed to get most of the plants from last weekend's plant sale in the ground today.

There's just a few plants left and he's trying to decide where to plant them. If they go in the backyard, the chickens will likely destroy them. So, we either need to pen the chickens, or find a place in the front yard.


Friday, May 11, 2012

More Paint Stripping

Normally when Sharon strips paint on doors, she does each "step" (heat gun then chemical then sand) on both sides of the door before she moves on. Today she decided to finish one side, including the detail sanding, and then flip the door. So, she finished side one of door #2 from the guest bedroom.

Then she flipped the door and continued to strip the paint on side 2 with the heat gun.

While Sharon worked on the door, Jeff got to work on preparing the bed in the front yard to plant the vegetable starts from last weekend's plant sale. It's been too cold this week to plant them outside, but the weather has at long last seemed to turn warm. And the forecast for the next week is good, so he's going to go for it and get them in the ground.

He blogged about the process at his blog, and he has the terraced planting berm all ready for the plants to go in tomorrow.

Sunday, May 6, 2012

Back to Work

We had another beautiful day today so Sharon found herself looking for a project she could do outside. Since Jeff was going off to an SCA event, she decided to get started stripping paint on another bedroom door.

She spent nearly 7 hours on the project. She finished going over the first side of the door with the heat gun and scraper and then got started on the second side. She worked until her hand decided it was beyond done—Oww. It will be a few days before she can get back to this project.

Heat Gun Finished on First Side
Heat Gun Started on Second Side
This week we're planning to turn our attention to the garage anyway. If the weather cooperates, we're planning to spend several days sifting the garage (again) with an eye toward renting a trailer on Thursday to move the bulk of the stuff out of there. Then we can really evaluate the condition of the garage and decide how to proceed with the project.


Monday, March 19, 2012

New Door Hardware

After searching for many months, Sharon finally found a great deal on new traditional style brass interior door hardware. She's writing to share this affordable resource with others who might be having the same re-plate or replace dilemma.

We had been planning to re-plate the existing door hardware, but it actually turned out to cost about the same, even a bit less for some doors, to simply replace the pieces.  Sharon looked diligently for a good deal on the plating (she wrote at least half a dozen re-platers for email quotes), but the least expensive deal she was able to find was $14 per knob and $12 per plate which would come to $52 per door!

So, ultimately, when we found Crown City Hardware, we simply decided to replace the hardware on the doors. Their interior set is $49.99 per door and we believe it is solid brass—not plated.


We still haven't installed the screws on the new set because the locks came with phillips screws. We're going to buy slotted screws which are more accurate for the period. It is nice that these new sets can be installed and tightened up and stay in place without the screws.

They also sold a neat dummy spindle in order to assemble matching dummy knobs for our pantry doors.

We did run across a problem with a privacy lock set for the bathroom door; the pin sticking out from the turn latch doesn't fit into our existing mortise locks. We're trying to find out if we can change the part on the new plate that will fit in our existing mortise, but we might have to buy modern mortise locks for the two bathrooms, because ultimately we'd like to be able to lock the door when someone is using the room.

Friday, March 2, 2012

Eugene Adventure

We had a grand adventure today! We went off to Eugene and bought the used garage door and even managed to negotiate a bit of a discount to cover our traveling expenses.

Then we dropped in at BRING Recycling! It was neat. They had some really interesting decor built from salvage. And they seemed to have better prices than the Portland salvage stores, too.


We actually found two aluminum-exterior and wood-interior windows in frames that were almost exactly the size we needed, but then we realized the windows had some sort of nearly opaque coating on them that we weren't sure we could remove, so we did not buy them. Bummer, they would have been perfect and the pair was only $75!

We did, however, buy an entry door for the garage complete with the door jamb for $50—half the price of the door we found at the Rebuilding Center. The door even has a dog door in it! It also has a funky burgundy and purple paint job, but as fun as the colors are, we'll be cleaning up the door and painting it our colors, of course.